How to Make Mehndi at Home – Step-by-Step Natural Cone Recipe
In a world filled with chemical beauty products and synthetic alternatives, there’s something deeply comforting about returning to our roots. Mehndi, or henna, is one such tradition. For generations, it has been used not just for beautification, but also for healing, cooling the body, and expressing emotion through art. While readymade cones are easily available today, many people are rediscovering the joy of making mehndi at home—naturally, safely, and with love.
This guide is for anyone who wants to experience the authentic process of preparing mehndi from scratch. Whether you’re a beginner or someone who has always relied on store-bought cones, this step-by-step recipe will show you how to make mehndi that is rich in color, free from harmful chemicals, and deeply satisfying to use.
🌿 Why Make Mehndi at Home?
Before we jump into the process, let’s talk about why so many people are choosing to make their own mehndi cones.
1. Purity and Safety
Most commercial mehndi cones contain artificial dyes, preservatives, or even harmful chemicals like PPD (paraphenylenediamine), which can cause allergic reactions or skin burns. Homemade mehndi uses only natural ingredients, making it safe even for sensitive skin.
2. Better Stain Quality
Fresh mehndi gives a much deeper and longer-lasting stain. You can control the ingredients, mixing time, and resting period to maximize the color intensity.
3. Emotional and Cultural Connection
Making your own mehndi connects you with generations of women (and men!) who’ve prepared it lovingly for weddings, festivals, and prayers. It’s a form of self-care rooted in tradition.
4. Cost-Effective
With just a few basic ingredients, you can prepare several cones at home—enough for your friends, family, and yourself.
🛒 Ingredients You Need
Here’s a list of everything you’ll need to make natural mehndi at home.
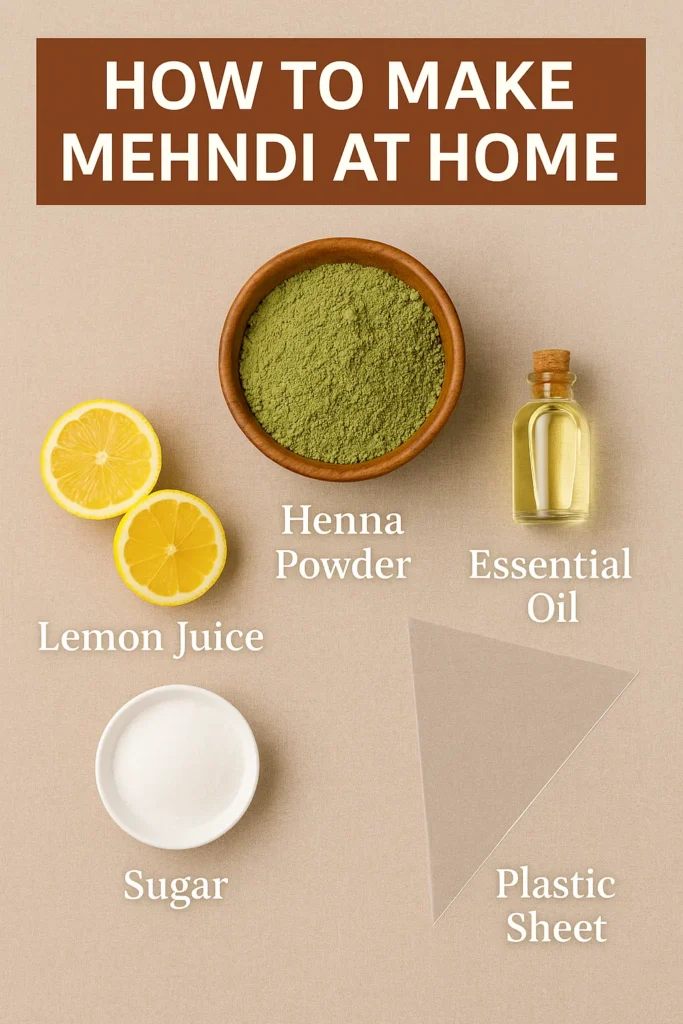
✅ Basic Ingredients:
- Henna Powder (100% Natural) – 100 grams
- Lemon Juice – 1–2 medium-sized lemons
- Sugar – 1 tablespoon
- Eucalyptus Oil or Clove Oil – 1 teaspoon
- Tea or Coffee Water (optional) – for deeper color
✅ Tools:
- A non-metallic bowl for mixing
- Plastic wrap (cling film)
- Spoon or spatula
- Fine sieve (to strain powder)
- Empty plastic sheets for cones
- Cellophane tape or rubber bands
- Scissors
- Zip-lock pouch (for storing)
💡 Tip: Always use body art quality henna powder. It should be fresh (less than 6 months old) and stored away from moisture.
📝 Step-by-Step Recipe to Make Mehndi at Home
🥄 Step 1: Sift Your Henna Powder
Use a fine sieve or muslin cloth to sift the henna powder. This removes lumps and dirt, ensuring a smooth, clog-free paste.
Why it matters: Any debris can block your cone tip while applying designs.
🍋 Step 2: Add Lemon Juice Slowly
Start adding lemon juice little by little to the henna powder. Mix with a spoon or spatula until you get a thick, mashed-potato-like consistency.
Pro Tip: Don’t add all the juice at once. Over-wetting can ruin the mix.
🍬 Step 3: Add Sugar and Essential Oil
Once mixed well, add 1 tablespoon sugar and 1 teaspoon eucalyptus or clove oil. Stir until the mixture is smooth. Sugar helps the paste stick better to the skin, and oil boosts stain quality.
⏳ Step 4: Cover and Let It Rest
Cover the bowl with plastic wrap and let the mixture rest overnight (6–12 hours) at room temperature. This allows dye release from the henna.
How to know it’s ready? The top layer of the paste turns dark green or brown, and it smells earthy and rich.
☕ Optional Step 5: Add Tea or Coffee Water
If you want a deeper stain, brew strong black tea or coffee. Cool it and add a few teaspoons to your paste while mixing after resting.
🎨 Step 6: Adjust the Consistency
After resting, stir again and check if the paste flows smoothly but isn’t runny. If it’s too thick, add a few drops of lemon juice or water.
Consistency check: The paste should fall in ribbons and not splatter.
🌀 How to Make and Fill Mehndi Cones
This part can seem tricky at first, but with practice, it’s simple and fun.
✂️ Step 1: Cut Plastic Sheets
Cut rectangles (approx. 6×6 inches) of cellophane or plastic. You can also use ready-made cone wrappers from the market.
🌀 Step 2: Roll the Cone
Take one plastic sheet and roll it into a cone shape—tight at the tip and wide at the back. Use cellophane tape to secure it in place.
🥄 Step 3: Fill the Cone
Use a spoon or piping bag to fill the cone 2/3 full with the henna paste. Push it down gently so there are no air pockets.
🔒 Step 4: Seal the Cone
Fold the back of the cone like a triangle and tape it securely or tie it with a rubber band. Trim the tip to the size you want—fine for intricate designs, wider for filling.
🎯 Test the flow on paper before using it on skin.
🧊 How to Store Homemade Mehndi Cones
If you’ve made extra cones or want to use them later, here’s how to store them safely:
- Short-term: Wrap cones in cling film and store in the refrigerator for up to 7 days
- Long-term: Keep in freezer for up to 2 months
- Re-use tip: Let the cone thaw for 30–60 minutes before applying
❌ Don’t refreeze a cone that’s already thawed once.
⚠️ Common Mistakes to Avoid
Here are some beginner mistakes you can avoid:
| Mistake | Why It’s Bad | Fix |
|---|---|---|
| Using metal bowl | Reacts with henna | Use glass or plastic |
| Not sifting powder | Causes clogging | Always strain powder |
| Adding too much lemon juice | Makes paste runny | Add slowly and check texture |
| Applying paste immediately | Poor stain | Always let it rest overnight |
| Storing in heat | Destroys dye | Store in cool, dark place |
🌈 How to Test the Quality of Your Mehndi
Apply a small dot or line on your palm. Let it dry for 5–6 hours and scrape it off. If the stain is bright orange at first and turns dark brown within 48 hours, you’ve made perfect mehndi!
🌿 Natural Variations for Special Effects
Want to get creative? Try these natural boosters:
- Beetroot juice – Adds a pinkish tint
- Hibiscus powder – Boosts red tones
- Clove steam – Deepens the stain after application
- Sugar syrup seal – Keeps mehndi moist for longer stain time
Always patch test if you’re trying something new.
🧡 Real-Life Tip from My First Time
I still remember the first time I made mehndi at home. I used an old plastic bag and didn’t sift the powder—it clogged every few minutes! But with each trial, I got better. Now, every festival, I make 3–4 fresh cones and even gift them to friends. There’s something satisfying in knowing you’ve made it yourself, from scratch.
❓FAQs – Your Mehndi Questions Answered
Q. Can I use rose water instead of lemon juice?
A: Yes, but lemon juice is better for dye release.
Q. How long does it take to get a dark color?
A: Stains darken over 24–48 hours after removal.
Q. Can I apply mehndi on feet using the same cone?
A: Absolutely! Just make sure the cone tip is clean and smooth.
Q. Is homemade mehndi safe during pregnancy?
A: Natural henna is generally safe, but always consult a doctor if unsure.
📌 Conclusion
Making mehndi at home is not just a process—it’s an experience. It connects you with tradition, gives you control over what touches your skin, and brings creativity to your fingertips—literally.
By following this detailed guide, you can create rich, dark, chemical-free mehndi cones that rival even the best salons. So, the next time there’s a wedding, festival, or just a lazy Sunday with time to spare, go ahead—make your own mehndi and let your hands tell your story.